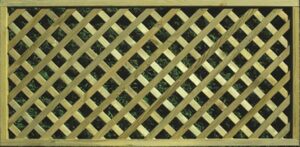
DIY Lattice: Make Your Own Treated Pine Lattice Panels
DIY Lattice panels are a great way to add a decorative touch to your outdoor space. They can be used to create privacy screens, trellises, and other garden features. But if you’re looking for a more cost-effective option, you can make your own treated pine lattice panels. This DIY project is relatively easy and can be completed in a few hours. Here’s how to make your own treated pine lattice panels.
Gather Your DIY Lattice Materials

Before you start your project, you’ll need to gather the necessary materials. You’ll need treated pine lattice panels, screws, a drill, a saw, and a measuring tape. You can purchase treated pine lattice panels from your local hardware store. Make sure to measure the area where you’ll be installing the panels so you know how many panels you’ll need.
Cut the Panels to Size
Once you have all the materials, you’ll need to cut the panels to size. Measure the area where you’ll be installing the panels and mark the panels accordingly. Use a saw to cut the panels to size. Make sure to wear safety goggles and gloves when cutting the DIY lattice panels.
Install the DIY Lattice Panels
Once the panels are cut to size, you’ll need to install them. Start by drilling pilot holes in the panels. This will make it easier to screw the panels into place. Use screws to attach the panels to the wall or fence. Make sure to use screws that are long enough to penetrate the wall or fence.
Finishing Touches
Once the panels are installed, you can add some finishing touches. You can paint the panels to match the color of your outdoor space. You can also add decorative trim to the edges of the panels. This will give the panels a more finished look.
Conclusion
Making your own DIY treated pine lattice panels is a great way to add a decorative touch to your outdoor space. This DIY project is relatively easy and can be completed in a few hours. All you need is treated pine lattice panels, screws, a drill, a saw, and a measuring tape. With these materials, you can cut the panels to size, install them, and add some finishing touches. With a little bit of effort, you can create a beautiful lattice panel that will add a unique touch to your outdoor space.
How to Make Your Own Treated Pine DIY Lattice Panels
Making your own treated pine lattice panels is a great way to add a unique touch to your outdoor space. With a few simple tools and materials, you can create a beautiful and durable DIY lattice panel that will last for years to come. This step-by-step guide will walk you through the process of creating your own treated pine lattice panels.
Materials Needed:
-Treated pine boards
-Lattice strips
-Screws
-Drill
-Saw
-Measuring tape
-Sandpaper
-Paint or stain (optional)
Step 1: Measure and Cut the Pine Boards
Measure the area where you want to install the lattice panel and cut the treated pine boards to the desired size. Make sure to leave a few inches of extra space on each side to allow for the lattice strips.
Step 2: Attach the DIY Lattice Strips
Lay the lattice strips on top of the pine boards and use screws to attach them. Make sure to use screws that are long enough to go through both the pine boards and the DIY lattice strips.
Step 3: Sand and Paint (Optional)
Once the lattice strips are attached, use sandpaper to smooth out any rough edges. If desired, you can also paint or stain the lattice panel for a more finished look.
Step 4: Install the DIY Lattice Panel
Once the DIY lattice panel is complete, use screws to attach it to the desired area. Make sure to use screws that are long enough to go through both the pine boards and the wall or fence.
Congratulations! You have now successfully created your own treated pine lattice panel. With a few simple tools and materials, you can create a beautiful and durable lattice panel that will last for years to come.
Please visit our informative DIY Lattice, the how to Do It Yourself section, or our sister site DIY Fencing at A1 Fencing.